Showing posts with label CPSIA. Show all posts

Thursday, July 1, 2010

Chalk Cloth Travel Mat Tutorial

I know!  I've been slacking this week on my posts.  That's what happens when you hit mid-term for summer school college classes and have to plan to get out of town for a week all at the same time :)

Anyway, the long promised tutorial on the chalk cloth mats.  I would love to say that I would be adding these to my Etsy store, but due to the lovely CPSIA regulations, I cannot.  The chalk cloth contains phalates and since those are now a big no-no I'll just have to share my method so that you can make your own :)

I was inspired by the wonderful tutorial over on Little Pumpkin Grace and Hudson too's blog (click to see her instructions).  I would say, in general, I followed her steps.  However, I made some alterations to what she outlined and thought I would share those.

Step one:  Buy supplies and figure out where the heck to buy chalk cloth.

I ended up buying my oil cloth from Joann's.  Limited selection, but I could take it with me that day.  If I had realized I was going to have to order the chalk cloth, I might have decided to order my oil cloth online.

Another option is to use laminated cotton rather than oil cloth.  I haven't actually seen this and it seems like it might be flimsier, but it doesn't have phalates.  If you're interested in that option, here is at least one online retailer that I found - I haven't bought anything here yet but the selection of fabrics was great :)

I ended up doing a search online for chalk cloth and ended up purchasing from NoveltyQuiltFabric.com - keep in mind that their pricing is for 1/2 yards.  Something I missed when I was ordering - luckily I wanted 2 yards so I ended up with a yard :)

Having said that, here are some other options:

Step two:  Wait anxiously for it to arrive.

Is it bad that I forgot that I ordered it until this heavy tube showed up in my mail?

I will say it did show up in plenty of time for me to make ten mats!

Step three:  Cut out chalk cloth, oil cloth pocket and backing to size.

I cut the chalk cloth and backing piece roughly 9.25" x 11.75".  The pocket was cut about 3" square.  You can obviously modify this to whatever dimension you want, but these make a nice tight roll.

At this point, you might also want to prep the chalk cloth by rubbing it with chalk all over and then wiping it with a damp towel.  It's just nice to not have to worry about that after you've sewn it together.

Step four:  Use black thread in the bobbin and matching thread for the oil cloth.

These keeps the stitching from showing ... as much.  I'm bad about adjusting my tension on my machine so you do see some of the top thread showing through on the back.  I like to leave the tension setting on auto figuring the machine probably knows better than I do what the tension should be ;)

Step five:  Try sewing using regular presser foot and then replace with walking foot.


I sewed the first two mats with my standard presser foot adding more and more painter's tape until I remembered that I have a walking foot that would probably work wonders!  And it did.  I recommend the walking foot if you have it - kept me from throwing things at my machine when the chalk cloth and oil cloth slid ;)


I did try Jessica's tip on using painter's tape to hold everything together, but she must have better tape than I did because mine just kept falling off ... typically with the ribbon that I needed to sew on.

Step six:  Remember to sew the pockets on first!

It's much easier if the pockets are sewn on first :)

I backstitched both when I started and stopped to make sure that we wouldn't have any issues with the pocket pulling off.  I had my needle set all the way to the right and stitched about an 1/8" seam allowance on the sides and about a 1/4" on the bottom.  There's no real rationale other than I liked the way it looked.  Feel free to experiment.  You might even try a zig-zag or other fancy stitch to dress it up!

Step seven:  Remember to sew the ribbon on the opposite side of the pocket.

I figured out that it's much easier if you put the chalk in the pocket and then roll the chalk into the mat so that the chalk is buffered by all the layers of the mat rather than rolling toward the chalk and having the pocket near the outside of the roll ... does that make sense?

Anyway, if you do that, then you need the ribbon to be opposite the pocket so you can actually close the roll up.

Do this ....


Not this!


Step eight:  If you forget to sew the ribbon on, don't worry you can still attach it!

If you forget to sew the ribbon on just go back and line up your ribbon on the stitching line.  Do a single backstitch when you start and stop just to make sure that your ribbon won't pull loose.  Trim the thread close to the mat on both sides.

Step nine:  Trim up the edges.  And be careful with the ribbon!


I trimmed all the edges to an 1/8" seam allowance since it was chalk cloth and oil cloth and they won't fray.  I simply took the ribbon and folded it back under the oil cloth.  The thing to remember is that because you're trimming it up with such a small seam allowance you really need to finger press the ribbon back so that you won't cut it.


And yes ... I did learn this from experience.  It's also how I know you can go back and sew the ribbon on afterward :)  See I figure out all the wrong stuff to do first so you don't have to!

Step ten:  Seal ribbon ends and add the button.

I sealed the ribbon ends using a lighter.  Just get it close to the ribbon, try NOT to light the ribbon on fire.  This trick works just like sealing the ends of rope - just be careful and don't touch the ends until they're cooled off.  (NO, I didn't do that ... this time ;)

I used pearl snap buttons that I had in my random stash of buttons.  These are the kind that have four parts.  I ended up rolling up the mat and checking to see where I wanted the button to be.  I started with the female side of the button (the non-fancy side) and using a spare block of wood and a hammer I pounded the two pieces together.  I then did the same with the male side of the button (the pearl button side).  I used a towel to help buffer the button from the hammer blows and tried to be gentle.


Step eleven:  Enjoy all your hard work!


Here's how I had them laid out for the kiddos.  


I was really happy with how quickly this project came together and if it weren't for those darn phalates in the chalk cloth I'd be adding these to my Etsy store.  Maybe one day ... as I mentioned above, they do make phalate free oil cloth called laminated cotton and it's a bit on the pricey side, but it sure is pretty!


Hope you enjoyed the tutorial!


TTFN!

Thursday, June 24, 2010

Featured Handmade Toy Alliance Member: MudPie Kids

So my final featured member this week is MudPie Kids.  She has some great felt toys for kids!

I love the originality and fun of these toys!  It also gets then away from all the plastic fruit and other food that you can buy in the big chains.

Here are a couple of my favorites!  Click on any of the images to visit the item listing.

I can just see M'Lou "squeezing" these to make juice!

I'm pretty sure these are free range eggs ;)

These have to be my favorite!  I love the color and texture of the veggies!

Hope you've enjoyed these highlighted members!  Please visit their online stores and support handmade toys!

TTFN!

Wednesday, June 23, 2010

Featured Handmade Toy Alliance Member: The Toycrafter

I am so pleased to be able to feature The Toycrafter on this blog.  I had the privilege of seeing some of their toys at a fair at the Arboretum last year.

The Toycrafter makes wonderful wooden toys - the kind that don't disintegrate into a million pieces with kid rambunctiousness.  Instead, these are the toys that get handed down for generations and get BETTER with age.

It was really hard not to just showcase all of the toys from Dave's site.  They're all just fabulous!  However, I picked three of my favorites and have to be content with that.  Please go to his site and browse - did I mention that he has some really wonderful toys?!?!  I will definitely be looking at these for gifts this year!  I think M'Lou may need Noah's Ark ... LOVE the animals!

Click on any of the images to go to open an new window and go to their site.


Noah's Ark


Auto Transporter

For the older kids in your life ...

A missile launcher!


TTFN!

Tuesday, June 22, 2010

Featuring Handmade Toy Alliance Member: Pinkhouse Handworks

I figured since I'm in Texas I would feature an HTA member from Texas.

In looking through the members of the HTA, I found Pinkhouse Handworks.  Janice makes some wonderful Montessori baby toys.  I wish I had found these when M'Lou was smaller!  All of these toys have been tested to comply with the CPSIA regulations.

Here are some of the toys that she has in her Etsy store.  Just click on the image to open a new window to go to each of the listings in her store.  Enjoy!!

Montessori Baby Toys set of 5
Circle Rattle
Stay tuned for another highlighted HTA member tomorrow!

Monday, June 21, 2010

Successful Weekend! (and Brief Soapbox)

So, the second birthday party of M'Lou went off well despite all the last minute things that always have to get done (such as buying a big fan since it was insta-sweat hot this weekend).

Here are a couple of pics of her party.
Here M'Lou is enjoying some time in the kiddie pool.

We had a friend make cake balls for her birthday cake.  SUPER yummy!

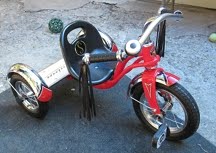
This is her spiffy new set of wheels.  We're good as long as there are no turns ... our legs aren't long enough to reach the pedals if we have to turn :)

I'll also be putting together my version of the chalk oilcloth tutorial this week.  Here's a sneak peek:

They were a huge hit with the toddler crowd so I thought I'd share what I learned in the process.  I'm thinking about adding them to my Etsy store, but now I have to do research to find out if it would be CPSIA compliant.   Arrrggghhhh!!!  Why is this legislation making every idea I have for kids so difficult?!?!?

On that note, I'll mention that this week is the Handmade Toy Alliance's (HTA's) blog week.  I'm going to climb on my soapbox for just a sec to talk about this.  I promise the rest of the week I'll just feature HTA member businesses :)

The HTA is an alliance of independent toy and children's crafters/manufacturers that have joined together to support each other primarily in response to the CPSIA regulation passed in 2008.  I know I've mentioned CPSIA in a couple of past posts.  If you're not in the industry you're probably not even aware of what this is, so here's a quick summary.

In 2008, Congress passed the CPSIA to regulate the children’s product industry, but this law has had unintended consequences.  It requires ALL children’s products to be tested at a third party testing lab.  AND the way the law reads, that's anything that might be used by a child - try to wrap your head around that one!  The CPSC has made some minor "clarifications" so that not EVERYTHING has to be tested, i.e. plain cotton fabric is now exempt from lead testing ... um ... hello?!? thought it would be obvious that plain cotton wouldn't have lead, but guess not.

Okay, you ask, so what is the big deal?  Don't you think we should protect our children?

Yes! I wholeheartedly agree that we should protect our children! However, the testing that is currently required (and constantly changing) is expensive, not to mention the fact that the testing often requires the destruction of several pieces for a result. For someone like me where I literally hand cut the fabric, sew the pieces on my home machines and then hand stitch on all the faces of my monsters, having them then destroyed (beyond the physical cost) is painful!!

To learn more, please visit www.handmadetoyalliance.com.

Wednesday, June 2, 2010

Baby Steps

Had a great relaxing Memorial Day Weekend.  Now it's back to reality and trying to get everything done!  It feels like every time I just about have it figured out something else pops up.  

Finally have a definitive answer on the CPSIA requirements.  Basically, until next year I should be good on both the clothing and the monsters since I don't use any small parts and cotton and polyester are exempt.  HOWEVER, starting next year, I'm going to be required to have my monsters tested.  We'll see if we're still around and having to worry about that when we get there (here's hoping this takes off :).

Have my logo done and now my list looks like this:

  • Complete DBA (doing business as) paperwork and file with state
  • Open business bank account
  • Create labels for clothes
  • Create labels for monsters
  • Create branding labels
  • Work on packaging for products
  • Finalized shipping costs
  • Stockpile items
  • Post products to Etsy store
That's doable ... right?!?

Now I just have to fit that all in between planning a 2 year olds birthday party and all the other daily chores I have already :)

I'll post some works in progress next time around - so check back soon!

Friday, May 28, 2010

The Beginning

As so many Americans have, I lost my job ... 6 months ago. It's really rough when you start actually counting! I have been applying for jobs and getting minor nibbles at first and fewer as time has gone on.

I've decided that I need something to keep me occupied and my brain working rather than diving into more of my favorite trash novels. And though I love doing the accounting and other basic business admin for my husband's business, it's not enough.

So, I've decided to make my crafting pay for itself. It would be lovely if this was the NEXT BIG THING!!!! but I have no delusions of so much grandeur. I'm starting with hand embroidered clothes for kids and stuffed monsters.

Sounds simple ... but then you get the lawyers involved. Don't get me wrong, I have some very good friends that are lawyers, but let's be honest ... they make it complicated. So, instead of just figuring out how to make these things, I have to figure out how they have to be labeled and whether they need to be tested so that I'm compliant with all federal regulations.

Luckily, the clothing is in the clear other than the labeling. For those labels, I have to be compliant with both the CPSIA and the FTC. For those out there that might also be looking into it, here are some links to help:


The sticking point I'm running into right now is whether I have to have my monsters tested by a third party lab. If so then I have to decide if those hoops are worth jumping through.

So, I'm heading into the home stretch on the store. Waiting to get the final logo art back from the graphic designer, figure out how to best label the products I'm making, how to best photograph everything, the layout for this blog and my stand-alone website, plus the complications of getting everything setup on Etsy .... I'm hoping I'm getting closer :)

TTFN!